Easy French Bread Recipe Using Kitchenaid Mixer
This post may contain affiliate links. Please read my disclosure policy.
Easy Homemade French Bread recipe made with flour, water, yeast, and salt in a stand mixer or by hand with step by step instructions. It's crispy right out of the oven. As it cools, it becomes a soft French bread you can use for anything!

What is French bread?
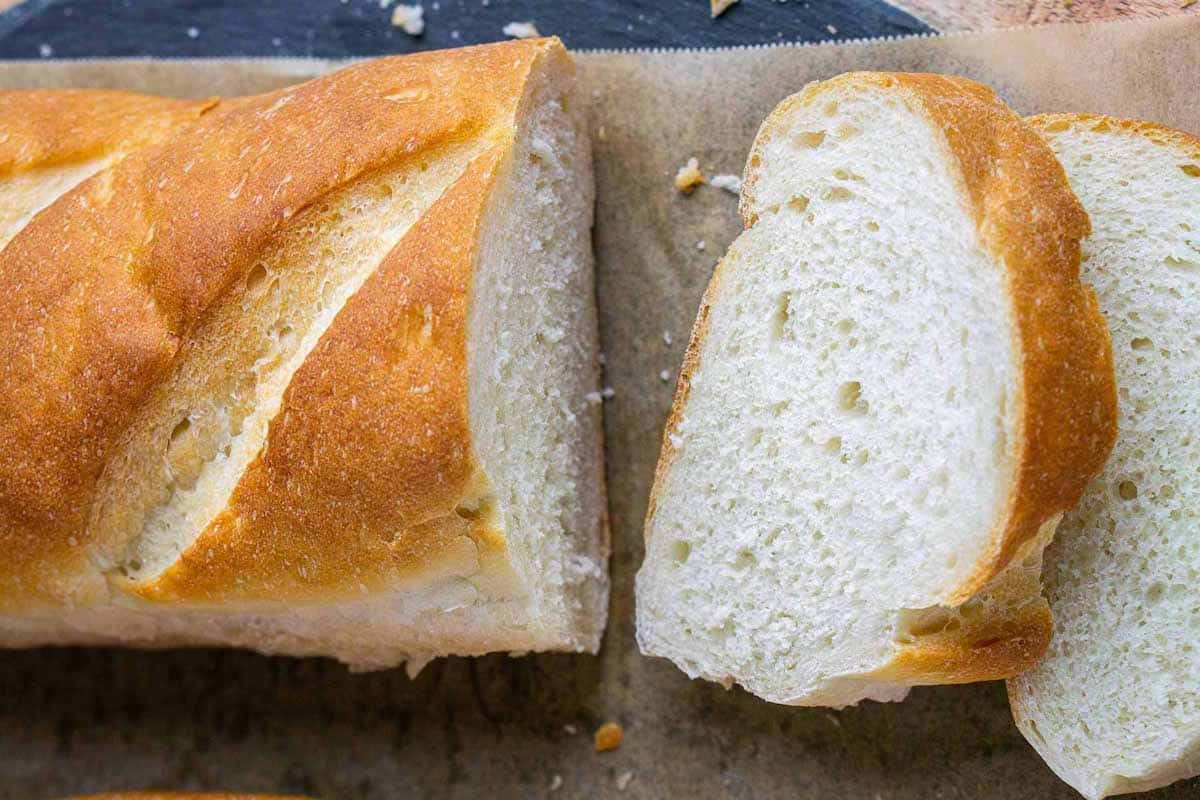
This homemade French bread is a simple yeast bread recipe made with flour, water, yeast, and salt. It can be kneaded by hand or a stand mixer and shaped into a baguette, sandwich loaf, oval, or round. Once it's baked, it actually comes out of the oven crispy and becomes a super soft French bread as it cools. Once you know how to make French bread from scratch, the sky really is the limit for yeast dough recipes.
Why we love this recipe
- great for bread beginners - This soft French bread recipe is simple and inexpensive. It's the perfect recipe to learn how to make bread.
- four ingredients - Flour, water, yeast, and salt (and few drops oil for proofing)
- two yeast options - You can use instant yeast (quick rise) or active dry yeast.
- two mixing options - French bread can be kneaded by hand and stand mixer.
- economical - Have you seen the store bought artisan bread prices lately?!
- enjoyment - It's fun and relaxing to make bread at home.
- other recipes - Leftover French bread makes beautiful crostini and French bread croutons.
- pairing - French loaf is a must for Minestrone, Lasagna Soup, and Chicken Alfredo!
How to make soft French bread
Here's a brief overview. Visit the printable recipe card below for detailed instructions.
- Combine water and yeast (bloom yeast if needed).
- Add flour and salt.
- Mix and knead the dough with a stand mixer or by hand.
- 1st proofing (allow dough to double in size). I highly recommend proofing dough in the Instant Pot to accelerate the rising process.
- Deflate and reshape to prep for 2nd proofing.
- 2nd proofing (optional but recommended for gluten development).
- Deflate and shape dough into final form (French baguette, oval, round, or loaf).
- Final proofing (allow the final form to expand before baking).
- Bake the French loaf.
- Cool and store.
Stand mixer bread vs hand kneaded bread
This soft French bread recipe can be easily kneaded with a stand mixer or by hand. In fact, I bounce between both, depending on the batch size I want to make.
How to knead French bread in the stand mixer
I use my 5 qt. Kitchen Aid stand mixer for this bread recipe, which yields about 2 lbs. dough. This size is perfect for my stand mixer with the dough hook attachment because it mixes and kneads without any delay. I've noticed with smaller batches that the stand mixer struggles because the dough hook needs more mass to gather and knead properly.
To mix dough via stand mixer: Secure the dough hook attachment. Use lowest speed to mix and knead ingredients into a cohesive, smooth, elastic dough (about 3-5 min). Sprinkle reserved flour into the bowl as needed during the entire mixing / kneading process to prevent the dough sticking to the bowl sides. You may also need to stop the stand mixer and pull the dough back into cohesion.
By the way, if you're shopping stand mixers, I create an article and YouTube video comparing two Kitchen Aid stand mixer models that has helped countless people decide which one to get.
How to knead French bread by hand
Hand-kneading - It's good to know how to knead dough without a stand mixer. In fact, I usually hand knead this French bread recipe when I make a half batch (1 lb. dough yield) because my hands can incorporate and knead smaller batches more efficiently than the stand mixer.
To hand knead: Stir ingredients together (using a utensil or your hands) in a large mixing bowl until a shaggy dough forms. Transfer dough to a steady surface and hand-knead until a cohesive, elastic dough forms (about 3-5 minutes). Sprinkle the reserved flour in small amounts as needed to prevent the dough sticking to the table or your hands during the entire process.
Which KitchenAid stand mixer is right for you?
Check out The Kitchen Girl's
feature comparison VIDEO of the Artisan and Pro 600!
Proofing
You can proof homemade French bread using different methods. Proofing dough in the Instant Pot is my favorite! It creates the ideal environment to proof at a constant 90°F temperature. It's so convenient because your dough doubles in size in only 45 minutes, even in a chilly or drafty environment.

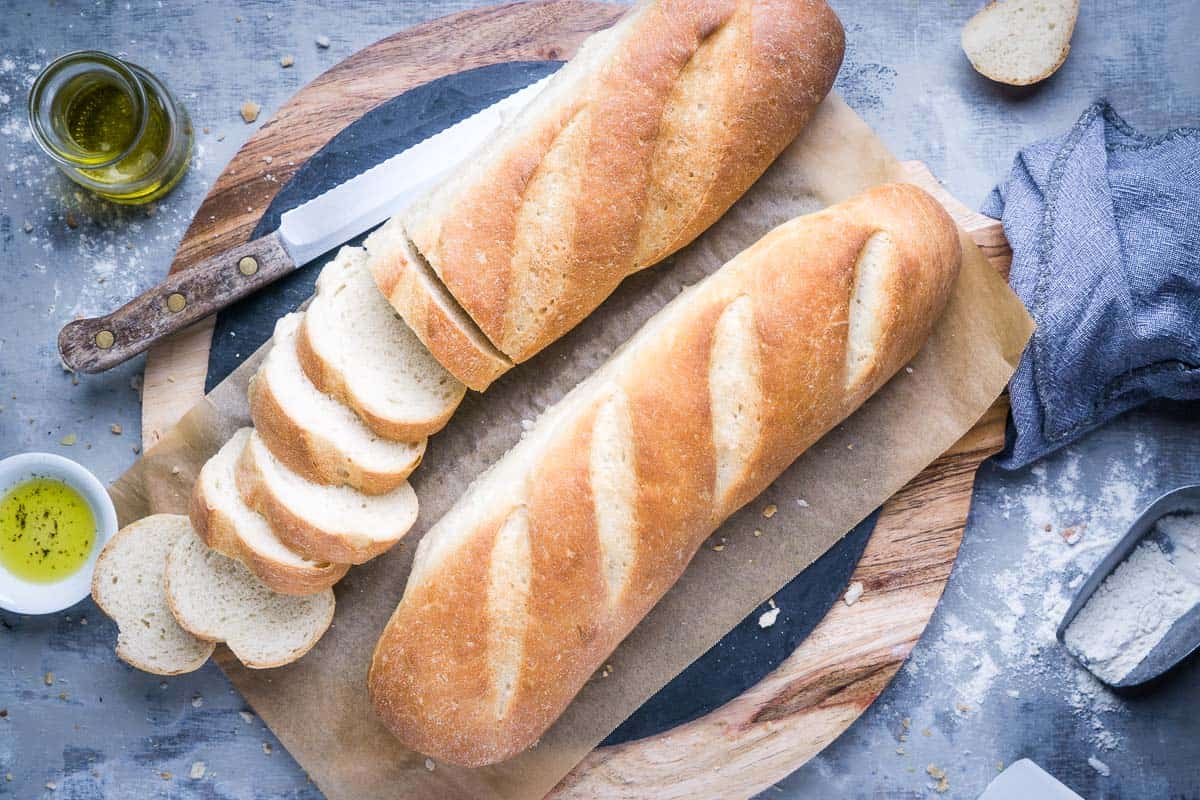
French bread shapes
Shaping French bread is half the fun! You can shape a baguette, sandwich loaf, or oval / round. Baguette pans are not required and I only occasionally use loaf pans. They're handy for maintaining loaf height though, especially if you're a beginner. Here are some 'before and after' examples of my French bread shapes.
Free-form French Baguettes or long loaves on parchment-lined baking sheet


French sandwich loaf in a loaf pan
Free-form oval sandwich loaf on a mini baking sheet
These are bare minimum bread tools needed for this recipe. Optional tools are listed in the recipe card below.
- mixing bowl (to mix bread dough by hand and/or proof dough)
- measuring cup and spoon
- instant read thermometer (water temp and baked bread temp)
- stirring utensil or bare hands (to combine ingredients)
- your hands (if not using a stand mixer)
- stand mixer (if not kneading by hand)
- baking sheet
- parchment paper (or oil or cooking spray) for bakeware
- razor blade or bread lame or knife or scissors (to score the dough)
- oven mitts (for safe handling of hot bread and bakeware)
French Bread FAQ
How do you keep French bread fresh?
Allow loaf to cool and store in an airtight bag or container at room temperature up to 2 days. It won't be as moist and chewy as the day it was made, but it's perfect for toasting.
Can you freeze French bread?
Yes. Allow French bread to cool completely and freeze in an airtight bag or freezer-safe container up to 30 days. To thaw, allow the loaf to rest in the refrigerator overnight or at room temperature for a few hours.
What's the difference between French and Italian bread?
The biggest difference is in the shape, especially with storebought bread. Italian bread tends to be shorter and wider, while French bread is usually longer and narrower.

How to use leftover French bread
Don't throw that day old French bread away, even if it's a few days old. Turn leftover French bread into these easy recipes. You'll save money because you're not throwing bread away and the store bought versions of these can be expensive.
- baguette crostini
- French bread croutons
- holiday stuffing
Also, if you love bread and can't have it, grab this crazy popular, tried and tested gluten-free bread recipe.

Yields about 2 lbs. dough (850 g)
- 1 ⅓ cup Warm Water (315 g), see instructions for temperature
- 1 (¼ ounce packet) Quick Rise Instant Yeast, or 2 ¼ tsp Active Dry Yeast
- 1 ½ teaspoon Sea Salt, *see recipe footnote
- 3 ½ cups Unbleached All Purpose Flour (530 g), do not pack it down
- Olive Oil, or cooking spray
-
your hands (if not using a stand mixer to knead)
-
see 'optional' equipment in recipe footnotes
-
Combine *WARM WATER and YEAST in mixing bowl or stand mixer bowl fitted with the dough hook attachment.
* Active Dry Yeast needs 100°F - 110°F water temperature. Combine and allow 5 minute rest until the yeast surfaces.
* Quick Rise Instant Yeast needs 120°F - 130°F water temperature. Combine and proceed to step 2.
-
Add FLOUR and SALT (reserve ½ cup flour to assist mixing). Stir ingredients together with a utensil (or stand mixer on lowest speed) until a shaggy dough forms.
-
Mix and knead dough with your hands (or stand mixer on low speed) about 5 minutes until it becomes stretchy and pliable. During mixing, sprinkle tiny amounts of the reserved flour into the bowl to prevent sticking.
-
Transfer dough to a lightly floured surface and shape into a tight, round form, tucking the sides under to form a seam on the bottom.
-
Perform 1st proof/rise by placing dough in an oil-coated mixing bowl (or Instant Pot), seam side down. Cover with a towel or draped plastic wrap and allow to double in size.
-
Deflate the dough (aka punch it down) to remove air bubbles. You can move on to the next step, or...
Perform 2nd proof/rise by shaping the dough into a tight round and repeat step 5. (The 2nd proof/rise is optional, but recommended to further develop texture and flavor)
-
Preheat oven to 450°F and let's shape these loaves...
Transfer the dough onto lightly floured surface. Press to deflate air pockets and divide dough into 2 or 3 equal sections.
Press each piece into a loose rectangle shape.
Fold and press dough into itself until it becomes tight while forming it into the final shape (baguette, loaf, or round).
Transfer to a prepared baking sheet or loaf pan. Brush surface with olive oil and cover to prevent air exposure.
-
Perform final proof/rise by resting forms in a warm spot until nearly doubled in size.
Score the dough by making ¼" slits across each loaf with a sharp tool.
-
Bake 20-25 minutes, rotating halfway through, as needed for even browning.
Fully baked French bread will be crisp and golden brown. If tested with a quick-read thermometer, it should be between 190°F - 200°F.
Note: The crisp surface will completely soften once it cools.
-
Transfer loaves onto a cooling rack and rest 5 minutes.
Remove loaves from pans and rest on the cooling rack until completely cooled (to retain moisture).
Store cooled bread in a plastic bag or airtight container up to 2 days at room temperature or 5 days in the refrigerator.
Visit the comments below and tell me how it went.
These tools are nonessential, but they can make your job easier when making bread
- digital scale - weigh ingredients and bread dough
- Instant Pot - for proofing dough
- plate or lid that covers the Instant Pot during dough proofing
- dough whisk - combines dough ingredients before kneading
- bowl scraper - helps remove sticky dough from mixing bowl
- sandwich loaf pan or baguette pan - helps shape and add height to loaves
- bread knife - serrated edges will cut straight lines
Instant yeast note: The packages are usually labeled as quick rise, rapid rise, and fast rising. They are all the same product.
Note about salt: Use sea salt, kosher salt, or non-iodized salt for this recipe because iodized table salt can affect yeast fermentation and flavor.
Serving: 1 2 oz. slice | Calories: 97 kcal | Carbohydrates: 20 g | Protein: 3 g | Fat: 1 g | Saturated Fat: 1 g | Polyunsaturated Fat: 1 g | Monounsaturated Fat: 1 g | Sodium: 147 mg | Potassium: 35 mg | Fiber: 1 g | Sugar: 1 g | Vitamin A: 1 IU | Vitamin C: 1 mg | Calcium: 5 mg | Iron: 1 mg
Nutrition data provided as courtesy estimates using unbranded ingredients from a nutrition database. Please consult preferred resource for precise data.
More Bread
-
Proofing Dough in the Instant Pot
-
Double Chocolate Banana Bread
-
Super Moist Banana Bread Recipe
-
Cranberry Walnut Bread
About The Kitchen Girl
Reader Interactions
jacksaidonithith71.blogspot.com
Source: https://thekitchengirl.com/french-bread-recipe/
0 Response to "Easy French Bread Recipe Using Kitchenaid Mixer"
Post a Comment